ScaleOut StateServer’s management console now runs as a web application. The console can be run on any host (i.e., any server that runs the StateServer service) system, and it can manage all other hosts on the same network subnet that are configured with the same management port. On a host with the ScaleOut service installed, navigate to http://localhost:4000 in a web browser to access the web console.
![[Note]](../common/images/admon/note.png) |
Note |
|---|---|
|
The StateServer service and the Management REST service must both be running on the local host for the web management console to operate. The Management REST service defaults to using port 4000 and is configured to accept requests from only the loopback address ("localhost" or 127.0.0.1). |
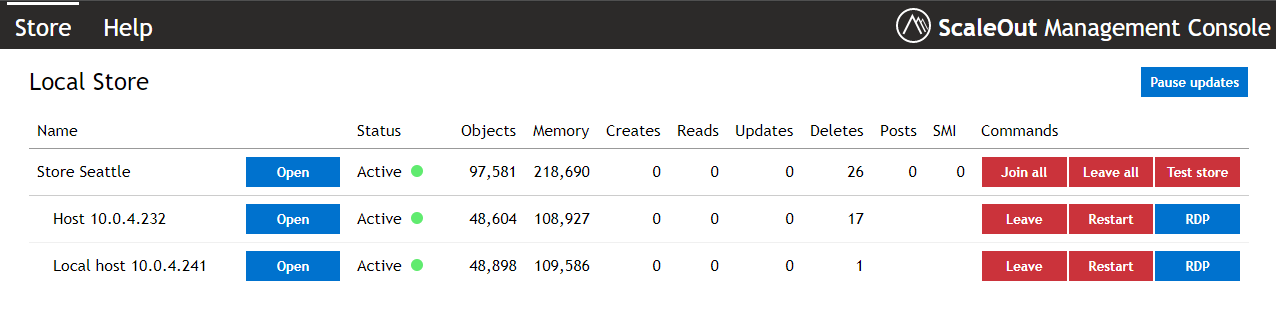
After startup, the management console presents the following display:
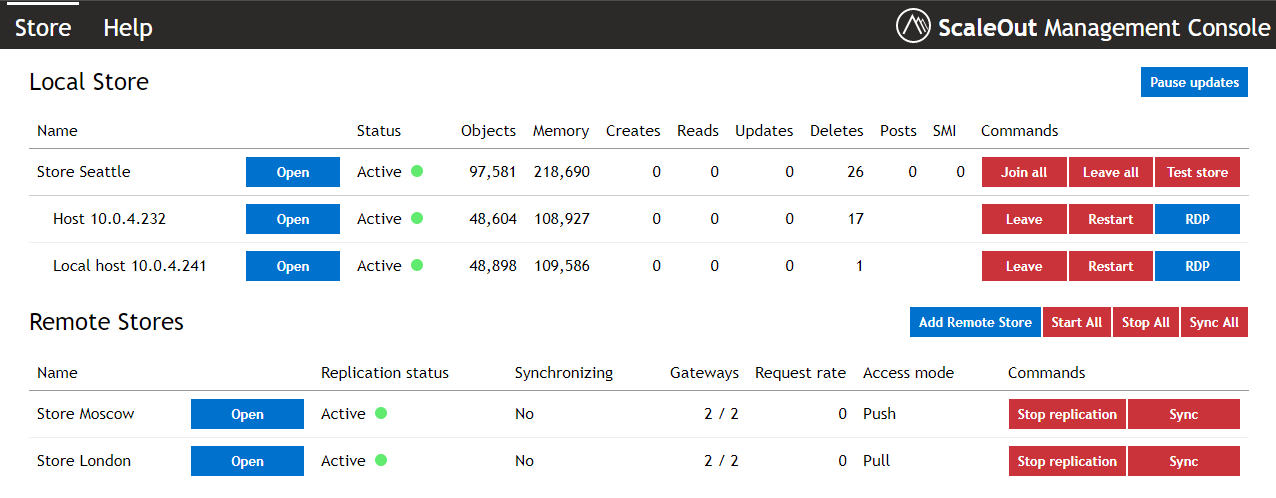
If you have enabled the ScaleOut GeoServer option, the management console displays additional features for managing replication to remote stores:
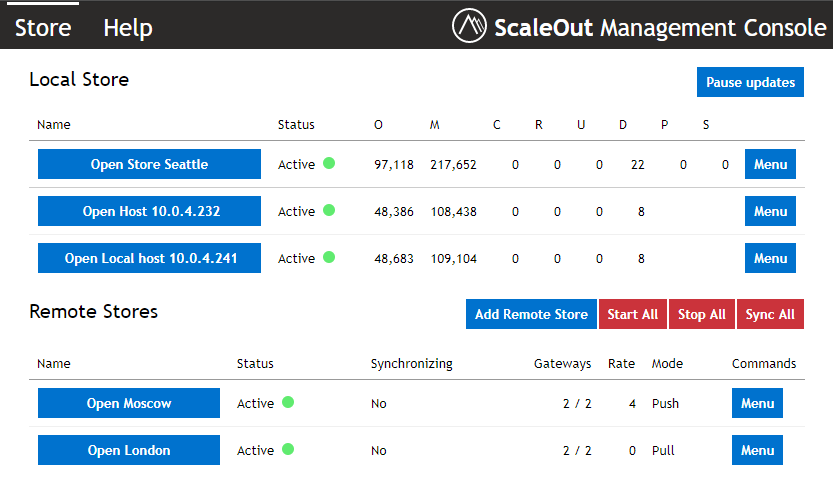
Depending on your browser window width, you may see a more compact view:
This display has two panes; the left pane is always visible and the right pane is revealed upon clicking the Open button. The left pane, called the Store List, contains a sub-list. The sub-list, called the Local Store List, depicts the store and shows the host IP addresses corresponding to hosts associated with the store. After clicking Open on any of the rows, the right hand pane displays details about the row. By default, the sidebar is not visible until one of these buttons is clicked.
|
Note |
|---|---|
|
If the local host’s selected network interface cannot be found, the loopback IP address, 127.0.0.1, will be displayed for the local host. The network interface is selected by the settings of the net_interface and subnet_mask parameters in the soss_params.txt (see Configuration Parameters). The StateServer service will periodically poll for the selected network interface, and it will automatically restart and use the interface if it becomes available. |
If the GeoServer Option is enabled, the left hand adds a second table, called the Remote Store List, that depicts the list of remote stores to which objects may be replicated. The items in this table correspond to the names of the remote stores that have been configured and are available to perform GeoServer replication. You can display and manage the configuration of individual remote stores in the right pane by clicking on the Open button for a specific remote store, or add a new remote store by clicking on the Add Remote Store button.
|
Note |
|---|---|
|
The client parameters file for remote stores, soss_client_params.txt (see Configuration Parameters), is stored in ScaleOut StateServer’s installation directory on every host of the local store. Versioning information is kept in the file to ensure that all hosts always have the latest updates to the file. It is not recommended to directly edit this file; please consider using the management tools instead. |
The following sections provide a more in-depth look at the store list and the sidebar’s sections.
The store list lets you quickly see which hosts are currently associated with the local store. It also displays a colored icon that shows the status of the store and of the hosts. The possible indications for the store’s status are:
|
|
Active |
The store has been created and is accepting access requests. |
|
|
Not ready |
The store has been created but is temporarily not accepting access requests (i.e., objects cannot be created, read, updated, or removed at this time) because one or more hosts are not ready. This situation usually occurs during failure recovery or dynamic load-balancing. |
|
|
Inactive |
The store has not yet been created because all hosts are inactive. |
|
|
Unknown |
The store’s state is unknown because the local host has not yet joined a host group. |


The possible indications for each host’s status are:
|
|
Joining |
The host has been activated and is joining the store. |
|
|
Active |
The host has been activated and has joined the store. |
|
|
Leaving |
The host was previously activated and is now leaving the store. |
|
|
Isolated |
The local host cannot perform queries and cannot interrogate remote hosts. The local host may be affected by a network outage. |
|
|
Unknown |
The remote host’s status is unknown. The local host may have experienced a network outage, or it may have failed. |
|
|
Not ready |
The host has been activated but is temporarily not ready due to failure recovery or dynamic load-balancing or memory exhaustion which has caused the StateServer service to start paging. |
|
|
Inactive |
The host is inactive and has not joined the store. |
|
|
Disconnected |
The host is not yet connected to a host group and cannot form a store. |


|
Note |
|---|---|
|
The management console may temporarily indicate that a host has a not ready status due to heavy network traffic that prevents a timely response to the console’s status queries. This does not necessarily indicate a problem with the host itself, and the status indication usually clears after a few seconds. However, it can be an indication of an overloaded network, in which case steps should be taken to reduce the network load or increase the network’s bandwidth. |
|
Note |
|---|---|
|
If a host remains in the not ready state for several minutes, the StateServer service will attempt an automatic restart to clear the condition. This could be an indication that the StateServer service is paging due to memory exhaustion. Be sure to check whether sufficient available physical memory exists for the service. |
The Local Store List shows the store’s current status and the number of hosts that have joined the store. It shows aggregate statistics for the store, including the number of stored objects, the memory consumed by the objects, and the approximate access rate for object create, read, update, and delete operations.
|
Note |
|---|---|
|
Statistics for replica objects, including the number of replica objects and the memory consumed for replica objects, are not shown in the Local Store List or any other statistical view. (As explained in the section Recovery from Failures SOSS creates up to two additional replicas for each stored object.) For example, if ten objects of size 1 kilobyte (KB) each are created in a three-host store, these sections show ten objects and 10KB total memory consumed by stored objects. |
The Local Store List shows a table of statistics for the store on a per host basis.
If present, the Remote Store List has one of the following status indications for each remote store:
In addition, each remote store in the list of remote stores has the following possible status indications:
|
|
Active |
Replication to the remote store has been started and is running normally. |
|
|
Unknown |
Replication to the remote store has been started, but connectivity to the remote store has been lost. |
|
|
Not ready |
Replication to the remote store has been suspended due to insufficient memory in the local store. |
|
|
Inactive |
Replication to the remote store has not been started. |
The Store sidebar can be opened by clicking the Open button next to the store name in the Local Store List, and provides several commands that simultaneously control all hosts in the store.
The Test store command verifies client access from all active hosts in the store. This command creates, reads, updates, and removes several objects so that all hosts in the distributed store are exercised. It reports the result of this test within several seconds.
|
Note |
|---|---|
|
The Test store command should not be used when one or more hosts are joining or leaving the store or if some hosts are temporarily displaying the not ready status due to dynamic load balancing. During periods of dynamic load balancing, this command may not return success within the allowed timeout period to heavy network traffic. In this case, retry the command after a few minutes after load balancing completes. |
The Clear store command lets you clear the contents of the distributed store. This command removes all stored objects on all reachable hosts. You should not use this command if a host currently is experiencing a network outage. Otherwise, some objects may be left in the store, and these objects may not have replicas.
The Join all command joins all inactive hosts to the store, and the Leave all command causes all active hosts to leave the store. (You should not use these commands while Join and Leave control operations on individual hosts are in progress.) In most cases, it is faster and more efficient to use these commands than to individually control hosts from their respective Host sidebars.
Finally, the Restart all command immediately restarts the StateServer service on all hosts and permanently removes all stored objects.
|
Note |
|---|---|
|
ScaleOut StateServer uses the Windows Service Control Manager (SCM) to restart the StateServer service. In some cases, the SCM may return an error when attempting to start the service. You can manually configure the SCM to restart the StateServer service as an automatic recovery action if the service fails. Please consult your Windows documentation for more information. |
The Charts section of the Store sidebar shows two dynamic charts of statistics for the store. The upper chart reflects the store’s current performance and access rates, and the lower chart reflects the store’s object storage statistics. The statistics are the same as those shown in the Local Store List view. Here is an example of this section:
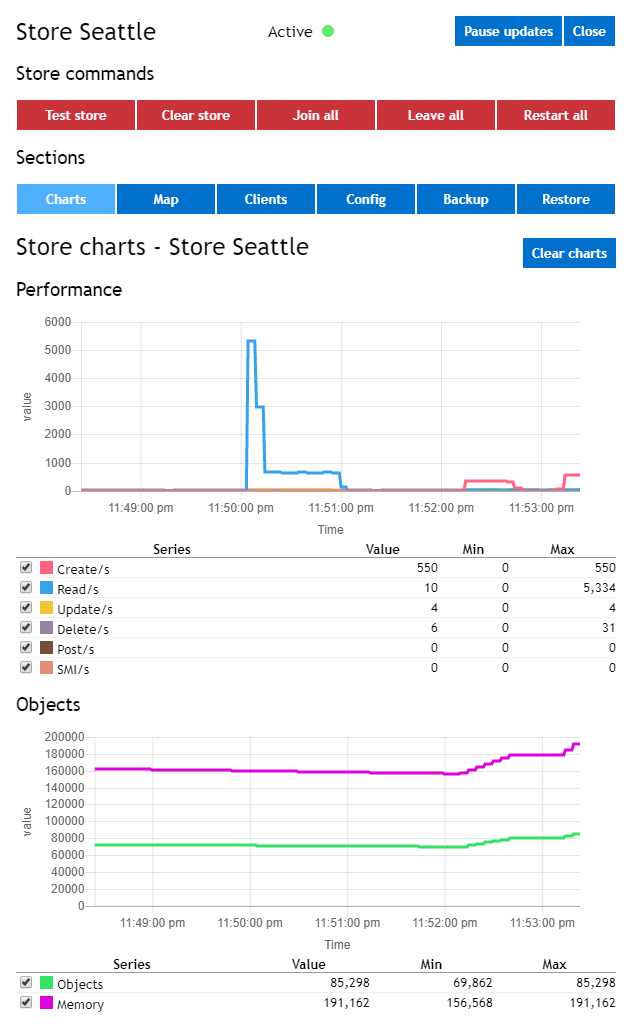
Individual statistics can be selected or deselected for display on the chart using the check boxes below each chart. The chart’s y-axis automatically rescales to display the largest value selected for display.
The Store Map section of the Store sidebar shows a dynamic chart of activity for the store by region within the store. A region represents a portion of the store in which objects are stored on a single host. Regions can be in one of several states, which are color-coded:
- ready to handle access requests (green),
- working on access requests (yellow),
- moving the contents of this region to another host during load-balancing (blue),
- not ready due to internal delays such as networking interruptions,
- unknown because the store has not yet been created, the local host is disconnected from the group, or the state of this region cannot be determined.
By hovering the cursor over a region, you can see the host on which this region is located. Here is an example of this section:
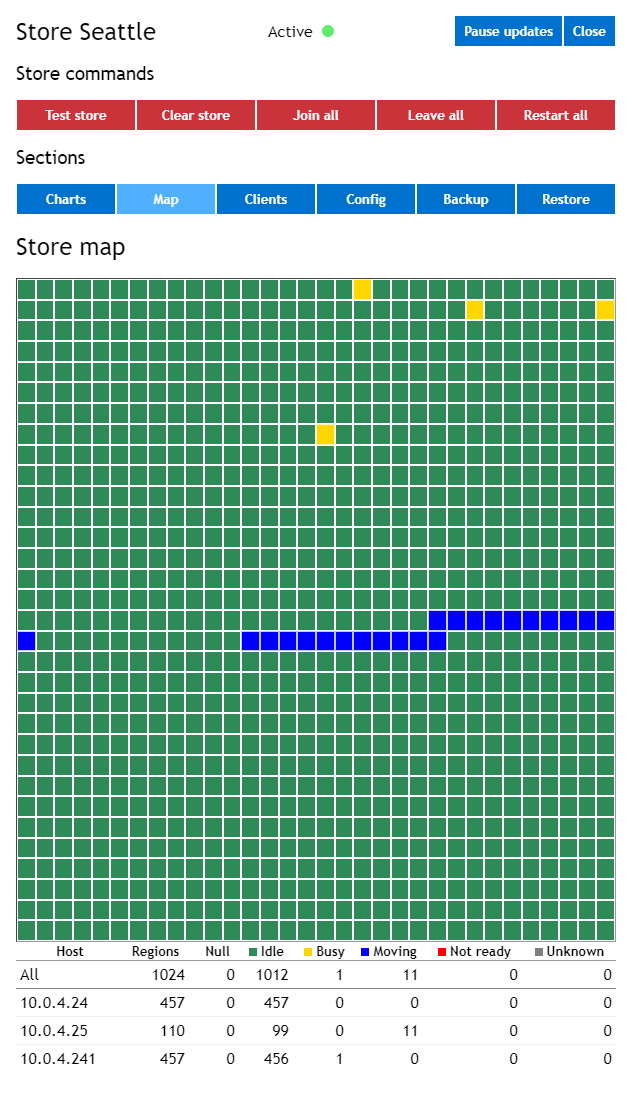
The store map lets you see the overall status of the store at a glance. This is particularly useful in determining whether the store is heavily loaded and whether access performance is being impacted by load-balancing. Since moving regions are offline while displayed in blue, you can see how much of the store is being load-balanced at any given time. For example, if a client is reporting access delays, this map lets you determine whether the entire store is affected or whether a subset of regions is experiencing delays due to rebalancing, and you can determine when rebalancing has completed.
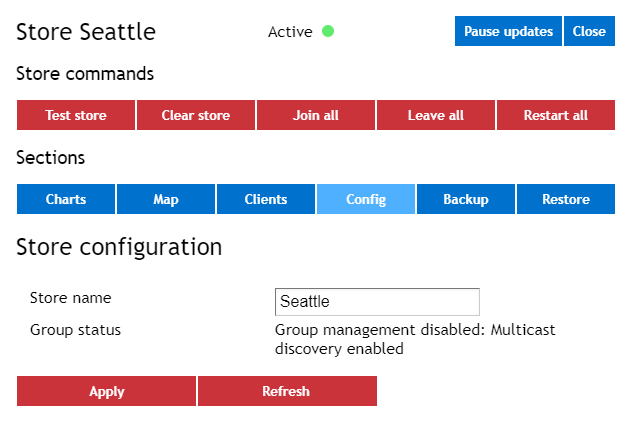
The Store Configuration section of the Store sidebar lets you specify the local store’s name for use in the GeoServer option’s pull access mode. Remote stores use this name to identify the local store. The name is stored in the soss_params.txt file as the geos_local_name parameter.
|
Note |
|---|---|
|
The local store’s name entered in this section must be identical to the name used when configuring GeoServer at the remote store. Otherwise, the remote store will not be able to push updates to the local store as part of pull access mode. |
Additionally, the Store Configuration section contains optional configuration for Group Host management if the local host has multicast discovery disabled in its host configuration. (See The Host Configuration section below.) When the StateServer service starts, it must first connect to a group of hosts which will form a distributed store. If no other hosts initially are present, it can create its own group. A host group is identified by the management port specified in the host’s configuration. If multicast discovery is enabled in the host’s configuration, the host group is automatically discovered using the multicast IP address specified in the host’s configuration, and cannot be manually modified; all hosts within a group must use the same multicast IP address and port.
The Group Host List is initially empty when no group IP addresses have previously been entered (or discovered through multicast). If no other group hosts exist, you can create a new group by pressing the Create button. This will place the local host’s IP address (used for its host id) in the group list and store it in the soss_params.txt file. Otherwise, you can specify one or more IP addresses of other hosts by entering them in the Add Member input and clicking the Add member button after each IP address is entered. You can connect to this host group by hitting the Connect button. Once the local host has joined the group, the Group Management icon turns from the disconnected state to the active state:
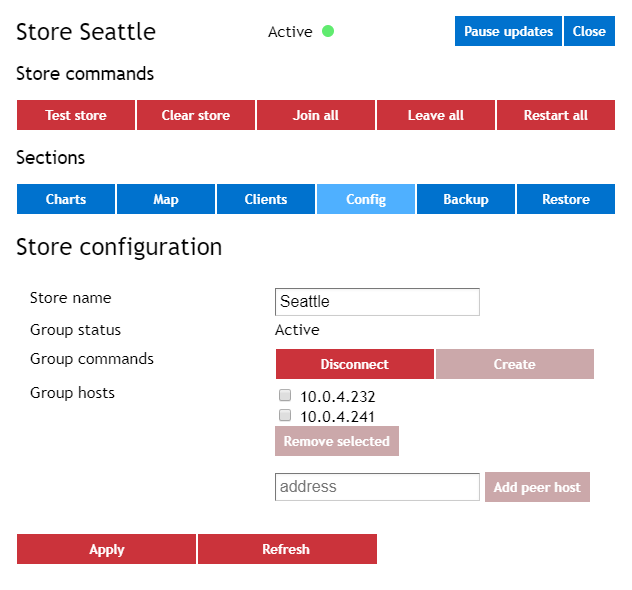
All IP addresses entered into the local host’s group list (or detected by multicast discovery) are stored in its soss_params.txt file. Once the host joins a group, the group lists for all hosts are updated automatically to include the IP address for the newly joining host.
A host can be disconnected from a group (and then possibly join a different group) by hitting the Disconnect button in the Group Management pane.
|
Note |
|---|---|
|
ScaleOut StateServer automatically detects and recovers from network subnetting. If a group is partitioned by network subnetting, it will form two independent host groups. If the subnetting issue is subsequently corrected, the hosts will automatically detect that the two groups can be coalesced and will recover according to the split-brain recovery policy. |
The Backup and Restore sections of the Store sidebar display the current status of an ongoing backup or restore operation and includes the identifier for the operation and its selected file path. The number of objects and files that have been successfully backed up or restored is displayed and updated every five seconds. Any errors encountered in backing up or restoring objects are also displayed.
Store Backup
Selecting the Backup section causes the Backup form to be displayed, as shown here:
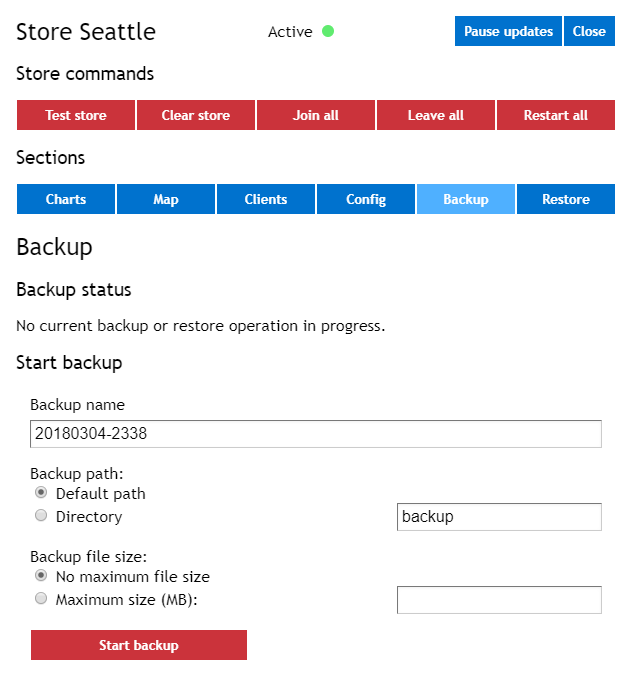
This section lets you initiate a backup operation and set the parameters of the operation. All parameters have default values which are used if not supplied in this form. The parameters are as follows:
- The Backup name is used to create the file name(s) for the backup files. Note that multiple backup files can be created for each backup operation. This identifier also is used to select the backup files to be restored. Default value: If no identifier is supplied, the date and time of the backup operation is used.
- The Backup path selects the file path to be used for the file folder in which the backup files will be stored. This file path can either be a local file path on each SOSS host, or it can be a shared file path on a file share which is accessible by all SOSS hosts. Default value: If no file path is supplied, the backup operation will use the folder called backup within the SOSS installation directory on each host.
|
Note |
|---|---|
|
If specifying a backup directory located on a network share, a fully-qualified UNC path must be used, the account under which the ScaleOut service runs must be granted network access, and the file path must be accessible from all hosts. Network paths mapped to local drive letters are insufficient due to Windows security policies. |
|
Note |
|---|---|
|
For fastest performance, select a file path to the local file system on each SOSS host. This enables the backup operation to create files in parallel on each host. |
- Backup file size specifies the maximum file size which should be used for grouping objects. Note that each SOSS host creates at least one file if it has objects to be backed up. Default value: By default, all objects backed up by each SOSS host are grouped into one file.
Once a backup is initiated, the backup progress is displayed and updated until it completes, as shown below:
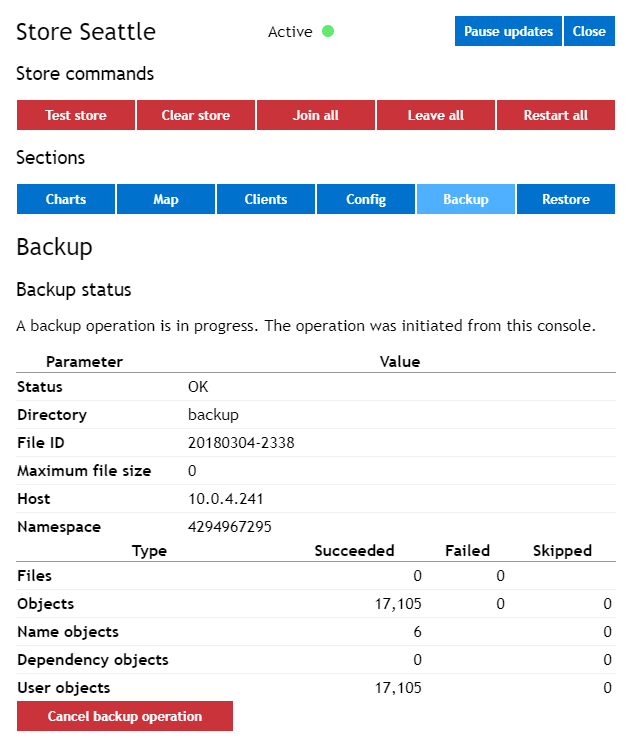
You also can cancel an ongoing backup operation by selecting the Cancel backup operation button; this will send a signal to all hosts to cancel the current operation.
Store Restore
Selecting the Restore section causes the Restore form to be displayed, as shown here:
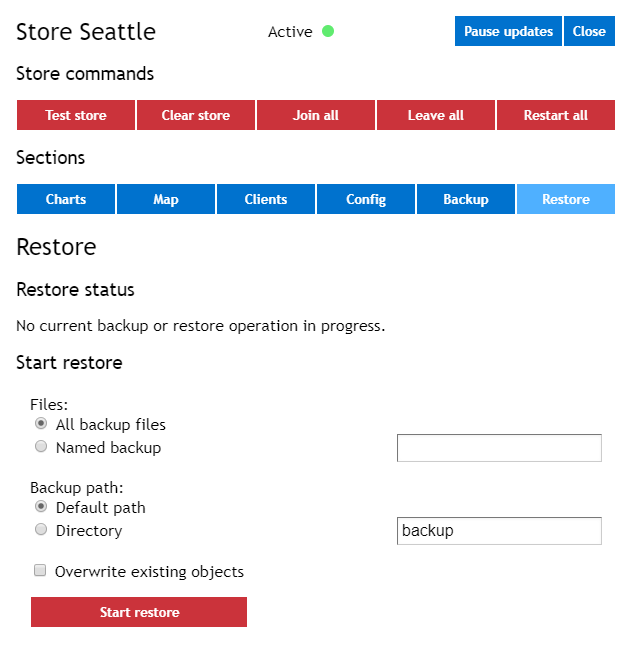
This form lets you initiate a restore operation and set the parameters of the operation. All parameters have default values which are used if not supplied in this form.
You can restore all files in the selected file path, or you can select a specific Backup name to be restored. The Backup name is created when the backup operation was initiated earlier.
By default, the restore operation will use the folder called backup within the SOSS installation directory on each host, which is the default location for creating backup files. You also can supply a specific file path where the backup files are located. This file path can either be a local file path on each SOSS host, or it can be a shared file path on a file share which is accessible by all SOSS hosts.
|
Note |
|---|---|
|
If specifying a backup directory located on a network share, a fully-qualified UNC path must be used, the account under which the ScaleOut service runs must be granted network access, and the file path must be accessible from all hosts. Network paths mapped to local drive letters are insufficient due to Windows security policies. |
|
Note |
|---|---|
|
For fastest performance, select a file path to the local file system on each SOSS host. This enables the restore operation to read files in parallel on each host. |
For convenience, you can move all backup files from the backup folders on each SOSS host to a common location, such as a file share, where they later can be restored. (All backup files have unique file names to avoid name collisions.) Although this will result in lower performance when restoring objects, in some situations it may be more convenient to locate all files within a single folder.
In the Restore form, you also can select whether to overwrite objects in the SOSS store when restoring them from backup files. By default, objects are not overwritten.
Once a restore is initiated, the restore progress is displayed and updated until it completes, as shown below:
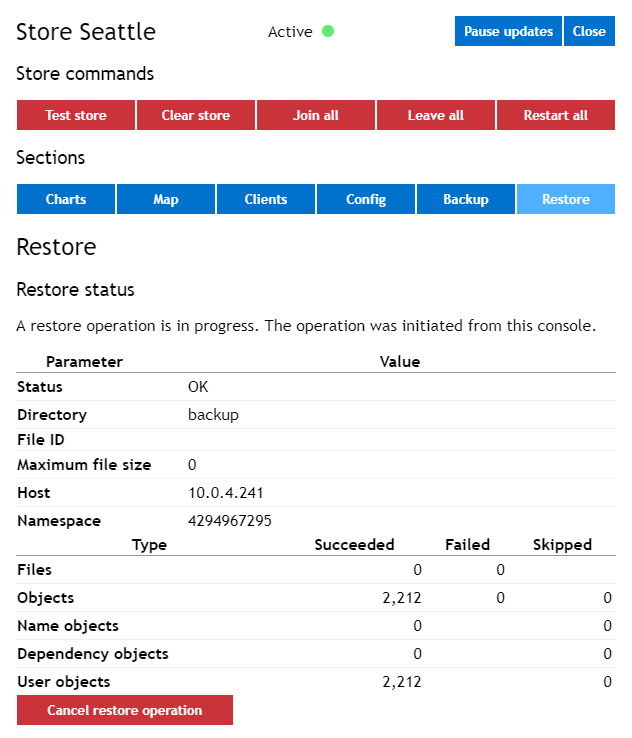
You also can cancel an ongoing restore operation by selecting the Cancel restore operation button; this will send a signal to all hosts to cancel the current operation.
When you click on the Open button next to any host in the Store List, the Host sidebar for the selected host is displayed as shown below:
This sidebar shows the host’s status and its statistics. It also has buttons for controlling the host. They include:
- a Join button to activate the host and join the store if it is inactive (otherwise, this button isn’t visible),
- a Leave button to de-activate the host and leave the store if it is active (otherwise, this button isn’t visible), and
- a Restart button to immediately de-activate the host, leave the store, and restart the service on the host.
|
Note |
|---|---|
|
Only one of the Join and Leave buttons are visible at a time. |
Additionally, the Host commands include a Remote Desktop button, which generates and downloads a file to allow convenient remote desktop access to the host, assuming the host is configured to accept remote desktop connections. Please consult your Windows documentation for more information.
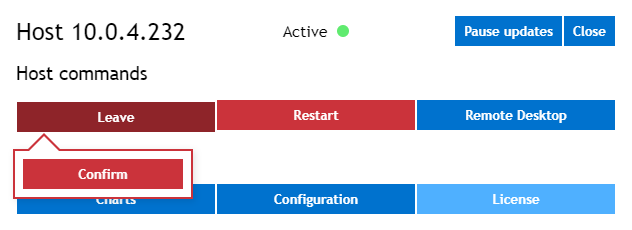
The join, leave, and restart commands require confirmation as follows:
Each host requires several seconds to join the store. However, multiple hosts can simultaneously join, and all hosts can be joined at once using the Join all command in the Store sidebar. After a host joins, it automatically receives a portion of the storage load. Over a period of several seconds to approximately a minute (or more in some cases), the dynamic load balancer slowly migrates objects to the newly joined host. During dynamic load balancing, the store’s aggregate access throughput drops intermittently, and it is normal to experience higher response times for some objects. The length of time required for dynamic load balancing is proportional to the number of joining hosts and to the current number and size of stored objects.
Store hosts always leave the store one at a time unless the Leave all store command is used to simultaneously stop all hosts in the store. Each host requires approximately a minute or more to leave the store. The host must first shed its storage load to other hosts, and other hosts must replace replicas stored on this host. During this rebalancing process, the aggregate access throughput may drop slightly, and it is normal to experience higher response times to some objects. The length of time required for rebalancing is proportional to the to the host’s number and size of stored objects.
|
Note |
|---|---|
|
It is important to allow a host to fully leave the store prior to shutting down the host or restarting the StateServer service. Otherwise, the host will abruptly leave the store, and other hosts will trigger recovery actions that further delay resumption of full storage throughput. In some cases, the distributed store can be destabilized, especially if multiple hosts are simultaneously stopped in this manner. Be sure to wait for the Leave command to fully complete (indicated by a red Inactive icon in the store list) prior to restarting the host. |
The StateServer Service Restart button lets you stop and then restart the StateServer service. This button is useful to reload parameter values or to clear error conditions. After confirming the Restart command, the service will attempt to gracefully leave the store prior to restarting; this process may take several seconds.
|
Note |
|---|---|
|
Do not restart more than one active host until recovery has been allowed to complete. The store’s recovery can require one or more minutes depending on the current storage load. Simultaneously restarting more than one host prior to awaiting complete recovery by the remaining hosts could cause data to be lost, and storage throughput could be affected for several minutes until recovery completes. |
|
Note |
|---|---|
|
Restarting the StateServer service on the local host will temporarily interrupt management operations using the management console or the command-line control program. |
|
Note |
|---|---|
|
ScaleOut StateServer uses the Windows Service Control Manager (SCM) to restart the StateServer service. In some cases, the SCM may return an error when attempting to start the service. You can manually configure the SCM to restart the StateServer service as an automatic recovery action if the service fails. Please consult your Windows documentation for more information. |
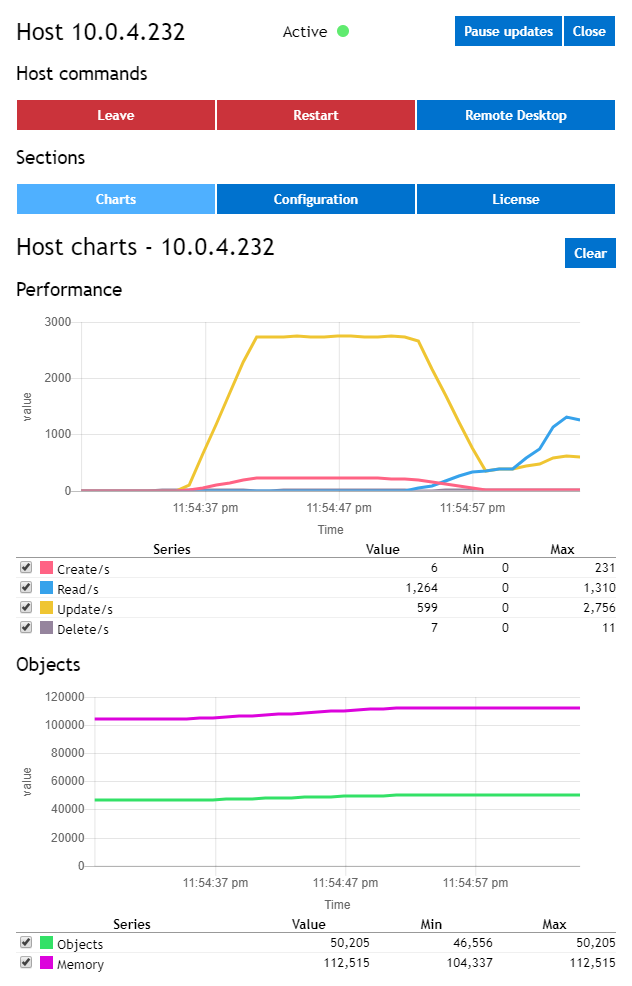
The Charts section shows a dynamic chart of statistics for the selected host. The statistics are the same as those shown in the Local Store List view. Here is an example of this section:
Individual statistics can be selected or deselected for display on the chart using the check boxes below each chart. The chart’s y-axis automatically rescales to display the largest value selected for display.
The Configuration section lets you set the configuration parameters for a host for use with ScaleOut StateServer. It looks as follows:
The configuration parameters shown on this section are described in detail in the section Configuration Parameters. You can commit your changes to the configuration parameters by pressing the Apply button, and you can cancel proposed changes and reset them to their currently configured state by pressing the Refresh button.
Configuration parameters are separated into two categories: Startup and licensing, and network configuration.
The startup and licensing section lets you enter a license key; license keys are described in the section Configuration Parameters. If an invalid license key is entered, the selected host’s StateServer service will be disabled so that it cannot be activated. You can update the licensing information by entering a license key and pressing the Apply button. The startup behavior controls whether or not the currently selected host will activate its StateServer service and join the distributed store when the service starts. The license key and startup behavior can be changed even if a host is currently active.
For your convenience, all available choices for the net_interface parameter are shown in a drop down list, and the current value is displayed as the selected item:
The displayed choices are based on the current setting for the subnet_mask parameter. For example, if subnet_mask is set to its default value of 255.255.255.0, all available class C subnets reported by the operating system are displayed. If you set subnet_mask to 255.255.255.255, all local IP addresses are displayed. (The service reports up to 254 IP addresses.) Initially, the network interface is shown as "not selected" unless only one interface is found, in which case the StateServer service uses that interface.
If the host’s IP address on the desired subnet is automatically supplied by DHCP, you should set subnet_mask to the subnet’s network mask, hit Apply, and then select a value for network_interface from the pull down list. In this case, whenever the StateServer service starts, it uses the first available local IP address reported by the operating system for that subnet. If you want ScaleOut StateServer to use a specific IP address, you should set subnet_mask to 255.255.255.255, hit Apply, and then choose one of the listed IP addresses for network_interface. Note that if this IP address becomes unavailable, the StateServer service will not be able to communicate with other hosts after it starts.
Once you select a network interface and hit the Apply button, the StateServer service restarts and selects an IP address for communications with other hosts based on the current settings for network_interface and subnet_mask. The selected IP address is shown as the host’s identifier.
If the host is active, all network configuration parameter changes are disabled. Changing the network interface, subnet mask, multicast IP address, server port, management port, or other parameters requires that the host be in an inactive state, and this will cause the host’s StateServer service to be restarted. As noted above, restarting the StateServer service on the local host will temporarily interrupt management operations using the management console or the command-line control program.
You can select whether this host will use multicast discovery to find other hosts in its host group, which together will form a distributed store. All hosts in a group must use the same management port value. If Use multicast discovery is enabled, you can change the default multicast address which the StateServer service uses for discovery. All hosts in a host group must use the same multicast address. If you uncheck this option, multicast will be disabled, and you can manually enter the IP addresses of other hosts in the group using the Group Management pane, as described above under Store Configuration.
The Configuration section also allows you to configure the gateway information for use with the ScaleOut GeoServer and Remote Client options:
This section lets you enter the gateway IP address and port for this host. As described under Configuration Parameters, the gateway address is used by the GeoServer option to let remote stores access this host within the local store to deliver inbound, replicated objects. It is also used by the Remote Client option to let remote clients connect to the store. Although this address need not conform to the host’s IP address as specified in the Local Store List, it must be reachable from remote hosts.
|
Note |
|---|---|
|
The gateway address is not used by other hosts within the local store to access this host. The list of gateway addresses for the local store is sent to a remote store (after the remote store initially connects) and used to access the local store over a secure communications network to deliver replicated data. By using multiple gateways to access the local store, data replication operates with the highest possible performance and availability. |
Note that three options are provided for the behavior of the gateway address and are encoded in the parameters file:

By selecting Track host IP address in the pull-down list (encoded as 255.255.255.255 in the parameters file), you specify that this host should use its current IP address in the Local Store List as its gateway address. This lets the gateway address automatically change if it is dynamically updated by DHCP. Alternatively, you can enter a static IP address, which might be an external address that must be routed to this host by your firewall. Finally, you can disable the gateway address to prevent this host from receiving replicated data. To maximize performance and availability of the local store for GeoServer replication and client access, you should avoid disabling the gateway address if possible.
The Licensing section shows you the licensed features that have been enabled by the license key entered in the Configuration section for this host. It also shows the current version of the StateServer service for the host to which the management console is connected. This section displays as follows:
|
Note |
|---|---|
|
In some cases, the value "(as licensed)"is displayed for a licensed feature. In this case, the licensed value for this feature is controlled by a specific license agreement with ScaleOut Software, Inc. Please refer to this license agreement for more information. |
If you have licensed the ScaleOut GeoServer option, the Store List pane contains a second section, called the Remote Store List. This section shows a table of remote stores that have been added to the client parameters file. It also shows whether replication to these stores has been started and its current status. The below example shows two remote stores, Moscow and London, for which replication is active:
After replication has been started, a remote store moves from the inactive status to the active status. If communications with the remote store are lost because no gateway address is reachable, the management console will display the unknown status until the condition clears. Finally, the table of stores shows the aggregate replication rate (bytes per second) to each active remote store. It also lets you add and remove remote stores, start and stop replication to all remote stores, and track the status of active replication.
You can add a new remote store to the table and to the client parameters file by clicking the Add Remote Store button to display the Remote Store Configuration sidebar.
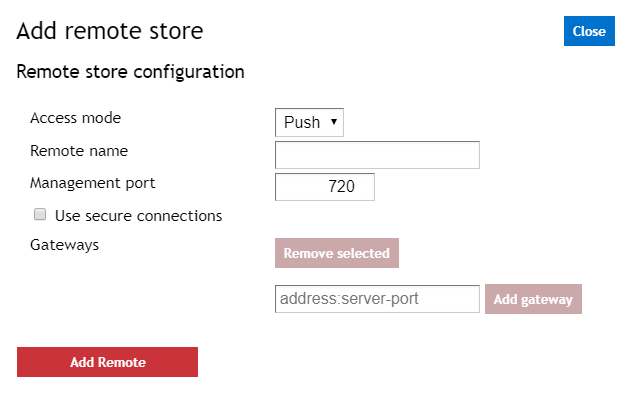
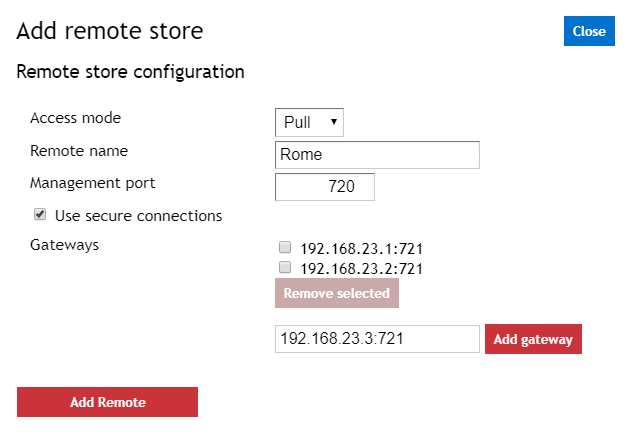
Fill out the information in the Add Remote Store section of the pane and click on the Add Remote button. For example, to add the remote store Rome to the current configuration, this section could be filled out as follows:
The remote store’s name is an arbitrary string of printable characters (except an embedded comma); it is used only by the local store to refer to the remote store.
|
Note |
|---|---|
|
When pull access mode is used, the remote store’s name entered in this section must be identical to the name used when configuring the geos_local_name parameter (in the Store Configuration section) at the remote store. Otherwise, the local store will not be able to push updates to the remote store as part of pull access mode. |
If the remote store will be configured to use secure connections, the remote store must already be configured to accept secure connections.
|
Note |
|---|---|
|
When configuring a new remote store, if secure connections are in use, the management port and server port should match the secure management port and secure server port in the remote store’s gateway configuration, respectively. |
To finish adding a remote store, one or more gateways must be added to the remote store configuration. The gateway IP address and gateway server port must be reachable from the local store. This gateway address is used to establish communications with the remote store and begin replication of objects to the remote store. After each gateway is configured, click Add gateway to add it to the remote store configuration. One or more incorrectly configured gateways can be removed by selecting its adjacent checkbox and clicking Remove selected.
|
Note |
|---|---|
|
If the host on the remote store corresponding to the gateway address is not part of an active remote store, the local store will not be able to connect to the remote store. To avoid this problem, you can add more gateway addresses to the client parameters file using the Remote Store Sidebar described below. |
Click on the Add Remote button to add access information for this store to the soss_client_params.txt file and to display the store in the Store List table.
You can repeat this process to add additional stores to the Remote Store List and record their access information to the soss_client_params.txt file.
The Remote Store List also includes buttons to simultaneously control replication to all remote stores. Both the Start All and the Sync All buttons start replication to all remote stores. In addition, the Sync All button first replicates all local objects (which are subject to replication) to the remote store. This lets you synchronize the contents of an empty remote store to that for the local store prior to beginning ongoing replication of object updates. You can stop replication to all remote stores using the Stop All button.
|
Note |
|---|---|
|
Replication commands are simultaneously performed on all hosts in the local store. |
These replication commands are also available on a per-store basis by clicking on the buttons next to the remote store name in the Remote Stores List or in the Remote Store sidebar described below.
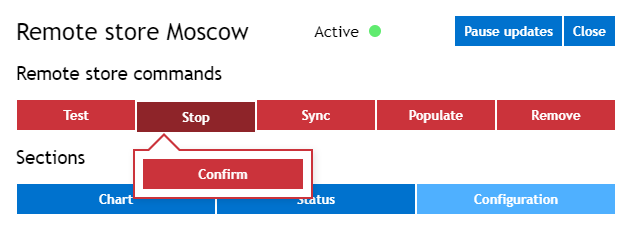
The Remote Stores sidebar lets you configure and control a specific remote store in the Remote Store List. This sidebar is displayed when you click the Open button in the remote store’s entry in the list:

The top of the Remote Store Sidebar shows buttons to control replication to the remote store:
- The Test button tests connectivity to the remote site. This command will attempt to reach the remote store on one of its listed gateway addresses. If no gateway address is reachable, an error message will be reported.
- The Start and the Sync buttons start replication to the remote store. In addition, the Sync button first replicates all local objects (which are subject to replication) to the remote store. This lets you synchronize the contents of an empty remote store to that for the local store prior to beginning ongoing replication of object updates. The Start button is only visible if replication is currently inactive.
- The Stop button stops replication to the remote store, and is only visible if replication is currently active.
- The Populate button will attempt to connect to the remote store and automatically retrieve the gateway addresses for all active hosts. This avoids the need to manually enter a long list of gateway addresses for a large remote store. You can periodically use this command to update the gateway list as the remote site’s configuration changes. You can also remove obsolete gateway addresses from the list by selecting them in the Remote Store Configuration section and pressing the Remove selected button.
- The Remove button stops replication and removes the entire remote store from the soss_client_params.txt file and the Remote Store List entirely.
|
Note |
|---|---|
|
Only one of the Start and Stop buttons are visible at a time, depending on the current replication status. |
|
Note |
|---|---|
|
Replication commands are simultaneously performed on all hosts in the local store. |
These replication commands are also available by clicking on the Menu button next to the remote store name in the Remote Store List as described above.
The Charts section shows a dynamic chart of statistics for all remote stores simultaneously. The statistics are the same as those shown in the Remote Store List view. Here is an example of this section:
Individual statistics can be selected or deselected for display on the chart using the check boxes below each chart. The chart’s y-axis automatically rescales to display the largest value selected for display.
The Remote Store Status section shows the remote store’s current status and statistics, which are updated automatically.
|
Note |
|---|---|
|
The hosts at a remote site must have joined a store to be reachable from the local store. This ensures that the remote store can receive replicated objects. |
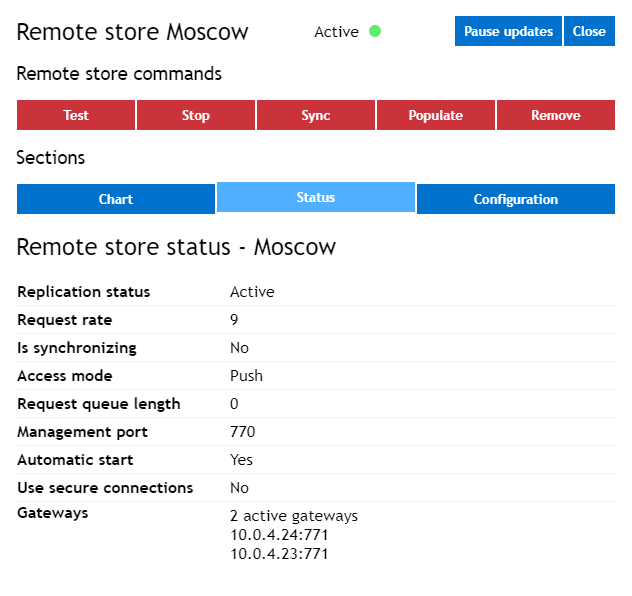
The Remote Store sidebar also has a table of gateway addresses for the remote store in the Gateways section. This table lists all gateway addresses that have been entered and stored in the client parameters file. Gateway addresses are used to establish communications with the remote store and begin replication of objects to the remote store. (You enter an initial gateway address when you first add a remote store to the client parameters file in the Remote Store List pane.)
This section lets you configure replication for the remote site to automatically start when the local store becomes active. When you select the desired replication behavior, this information is stored in the client parameters file. You may also correct or modify the configuration for the remote store; e.g., to use Push vs. Pull replication, or to correct the management port or encrypted connection configuration.
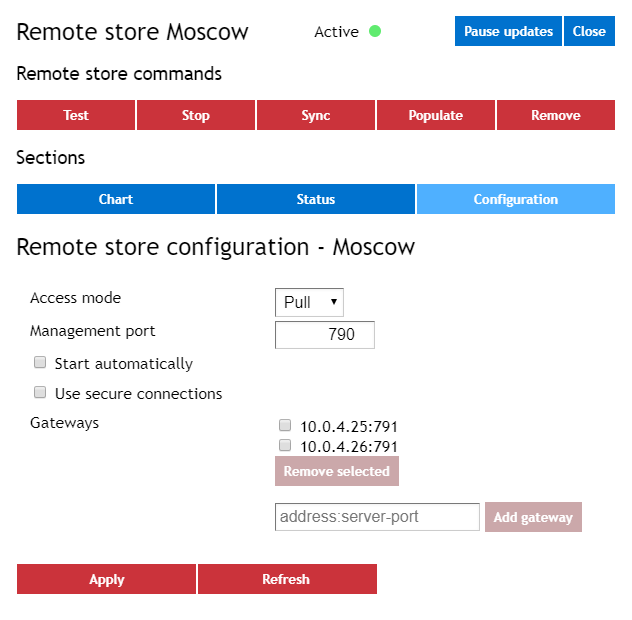
The bottom section of the Remote Store Configuration section lets you manually add more gateway addresses to ensure that you can reliably establish communications with the remote store in case one or more hosts at the remote store are offline. In the Gateways section, you can manually enter a gateway address for additional remote hosts in the remote store; press the Add gateway button to add the gateway IP address and gateway server port. The gateway IP address and gateway server port must be reachable from the local store.
