Running ScaleOut StateServer in a Microsoft Azure environment allows for the creation of highly-scalable in-memory data grids and takes full advantage of cloud environment benefits such as minimal IT overhead, zero upfront hardware costs, and on-demand scaling. Usage of ScaleOut StateServer in Microsoft Microsoft Azure uses subscription-based licensing and requires a purchase of a valid ScaleOut StateServer license.
Terminology
The following terms defined by Microsoft Microsoft Azure are used in this help file and defined here for your convenience:
- Environment: One of two deployment destinations for a Microsoft Azure cloud service: staging or production.
- Cloud Service: The packaged software programming and configuration settings deployed to and running on the Microsoft Azure compute environment. ScaleOut StateServer is deployed as a hosted service.
- Management Certificate: As used in the Management Portal, an X.509 v3 certificate that permits client access to resources in your Microsoft Azure subscription (such as hosted services or storage accounts). Management certificates are uploaded to Microsoft Azure with the legacy Management Portal at manage.windowsazure.com.
- Management Portal: The secure Web portal for managing subscriptions and deploying, managing, and monitoring services and data storage on the Microsoft Azure platform.
- Production Environment: A deployment area in which a Microsoft Azure cloud service is released live to serve external end-users or clients.
- Service Certificate: A certificate that provides secure interactions for users of your web application or service. Service certificates are uploaded to Microsoft Azure using the Management Portal or Service Management API.
- Staging Environment: A deployment area in a Microsoft Azure cloud service that mirrors the production environment and allows the service to be tested before deploying it to production.
- Storage Account: An account that provides access to Microsoft Azure storage services. A storage account is a globally unique resource within the storage system. The account is the parent namespace for the Blob, Queue, and Table services. ScaleOut StateServer uses a blob for each deployed SOSS store to hold configuration information.
- Storage Account Key: A value that is unique to a storage account and that can be used to connect to the storage account from code running in Microsoft Azure or locally.
- Subscription: A collection of Microsoft Azure offerings tied to a single Live ID.
- Microsoft Azure (formerly Windows Azure): The cloud operating system that provides the compute, storage, hosting, and management services for hosting customer-developed applications and services.
- Microsoft Azure Diagnostics: The Microsoft Azure feature that enables diagnostic data collection for a Microsoft Azure cloud service.
- Microsoft Azure platform: The infrastructure of hardware and software running in Microsoft data centers that allows customers to develop, manage, and host off-premises applications, data storage, and other services.
- Worker role: A method for deploying a virtual server in Microsoft Azure that launches a client application on server preconfigured to run the Windows Server operating system. ScaleOut StateServer runs on Microsoft Azure as a worker role.
To deploy ScaleOut StateServer in a Microsoft Microsoft Azure environment, begin by visiting https://azure.microsoft.com/ and signing up for a Microsoft Azure subscription. Record your Subscription ID to be used by ScaleOut StateServer management tools.
The ScaleOut StateServer Windows management console requires that the Microsoft Azure SDK, version 2.9, is installed on your system. Two installation components are required to be installed from Microsoft Azure SDK: Microsoft Azure Authoring Tools and Microsoft Azure Libraries for .NET. Be sure to install this SDK prior to installing ScaleOut StateServer. Otherwise, you will not be able to launch new Microsoft Azure instances from the Management Console, but you will still be able to manage your existing instances.
ScaleOut StateServer runs as a Cloud Service on the Microsoft Azure platform. Microsoft Azure Cloud Services require an X.509 Certificate (ending in .cer) and a matching Personal Information Exchange Certificate (ending in .pfx) for authentication. See http://msdn.microsoft.com/en-us/library/windowsazure/gg432987.aspx for details on creating and managing these certificates.
Additionally, ScaleOut StateServer uses the Microsoft Azure Storage Account to store information regarding Cloud Service deployments for use in ScaleOut management tools. The Storage Account credentials allow the ScaleOut StateServer management tools to intelligently manage deployed Cloud Services. Presently the storage account must be a "Classic" Storage Account as opposed to a "Resource Manager" storage account.
The SOSS Management Console can be used to easily launch and manage Microsoft Azure virtual machine images that are configured with the ScaleOut StateServer service.
Accessing Azure Management in the Console
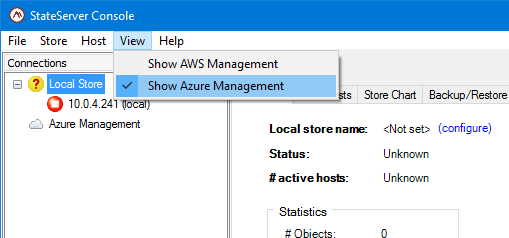
After completing the installation wizard, the SOSS Console will start automatically and will immediately prompt you to configure your connection to a ScaleOut StateServer store. Dismiss this prompt. In the Console’s View menu, toggle the Show Azure Management menu item. This will cause the Azure Management node to appear in the Console’s tree list on the left side of the window:
Creating a Microsoft Azure Connection
To deploy SOSS to Microsoft Azure, the SOSS Management Console must be configured to establish a connection to Microsoft Azure. Right click on the Azure Management node in the tree list and select Manage Connections from the context menu. The Microsoft Azure Connection Management window will appear:
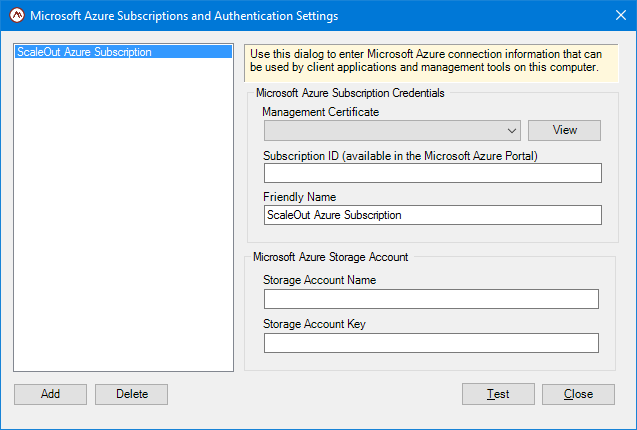
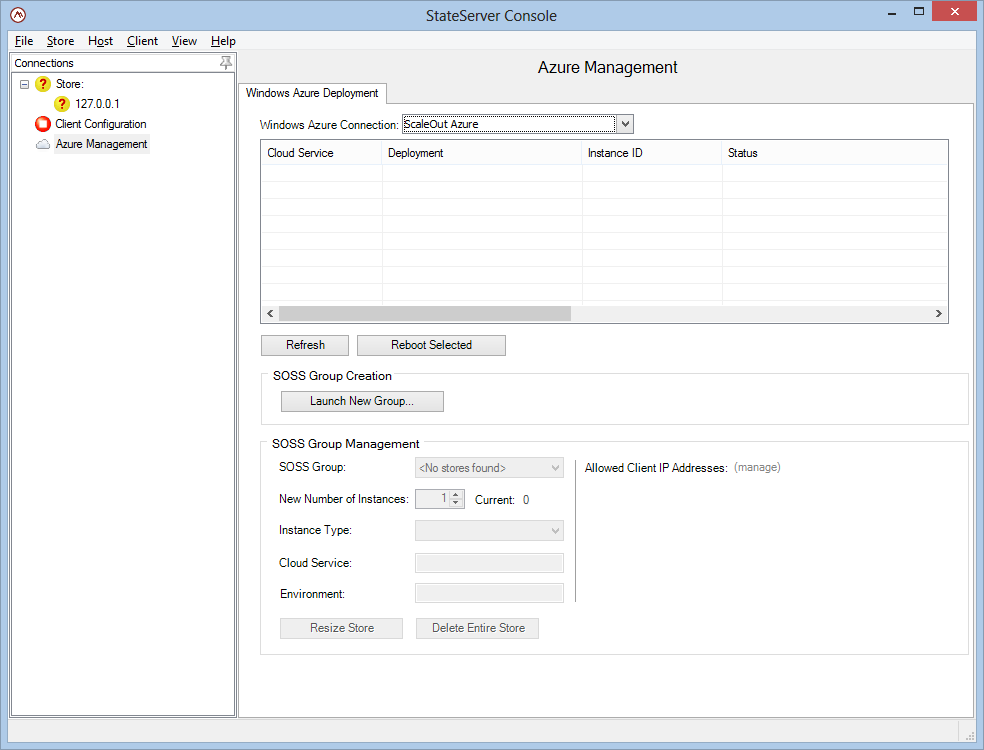
Use this window to define connections to Microsoft Azure using the credentials that you established earlier in the Prerequisites topic. If you need to manage SOSS stores using multiple Azure Management Certificates, you can click the Add button to define more connections for the different Management Certificates. Once the connection details have been entered, close the window and select the Azure Management node on the left side of the Console to open the Azure Management pane in the main area of the window:
Click the Microsoft Azure Connection dropdown to connect to Microsoft Azure using the connection details you have defined. (Note that the Manage Connections dialog also can be launched from this dropdown.)
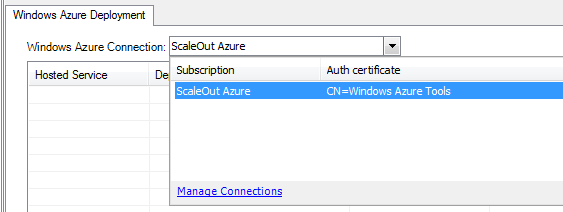
When you select a connection from this dropdown, the SOSS Console will connect to Microsoft Azure and will display any instances you have running under the current credentials.
Launching a New SOSS Host Group
Usage of ScaleOut StateServer in the Microsoft Azure environment requires you to create and configure a new Cloud Service for each SOSS store. This can be accomplished in the Microsoft Azure Management Portal. When creating a new Cloud Service, be sure to select "Do not deploy" in the Deployment Options field. Additionally, you may also wish to upload the .pfx certificate for allowing Remote Desktop connections.
You are now ready to launch a group of SOSS hosts which will form a single SOSS store. The ScaleOut management tools take care of all the configuration steps required for the deployed instances to form a single SOSS host group. After creating the Cloud Service, it is only necessary to provide your license key, select a store name, and decide how many instances to deploy using the Launch New Group wizard. In addition, several configuration options are available to you.
To start the wizard, click the Launch New Group button in the Azure Management pane. The Azure Settings page lets you fine-tune the Microsoft Azure settings for the instances that you are about to launch:
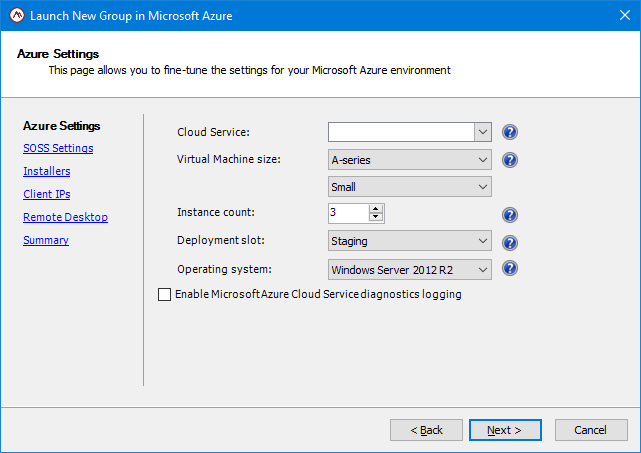
The following settings may be adjusted from this page:
- Cloud Service: Select the Microsoft Azure Cloud Service created earlier that you would like to launch the new instances into.
- Virtual Machine Size: An instance type defines the memory, CPU, storage capacity, and hourly cost for an instance. Specify the size of the instances that you’ll be launching. Click the help link to the side to view Microsoft’s current resource allocations for each VM size. Note that Cloud Service VM sizes differ from (non-Cloud Service) Virtual Machine sizes somewhat.
- Instance count: The number of role instances to deploy to in the Azure Cloud Service. With a single instance you will not gain resiliancy and fault-tolerance.
- Deployment slot: A Cloud Service has two deployment slots: Staging and Production. Staging slots are typically used for development and testing, then promoted to the Production environment upon final release. Cloud Services may switch their Staging and Production slots without redeploying the service. Please note that Staging and Production slots require separate ScaleOut StateServer licenses. A ScaleOut StateServer license may not be applied to more than one store.
- Operating system: Select a type of Windows Server platform you would like to install SOSS on. When you deploy a new cloud service, you can choose from the Windows Server 2008 R2, Windows Server 2012, Windows Server 2012 R2 or Windows Server 2016 operating systems.
- Enable Microsoft Azure Cloud Service diagnostics logging: Diagnostic data is not logged and stored unless you transfer the data to Microsoft Azure storage. Select this checkbox if you intend to transfer diagnostic data to Microsoft Azure storage. With this option unchecked some diagnostic information may still be available in local system Event Logs, as well as ScaleOut StateServer’s own logs.
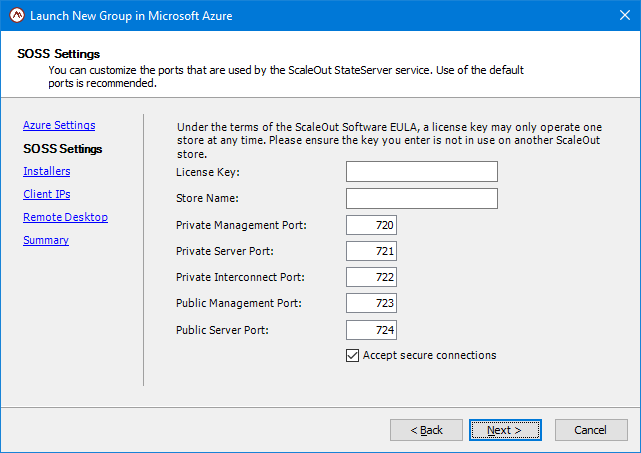
The SOSS Settings page lets you specify the license key and ports used by the ScaleOut StateServer service. Use of the default ports is recommended. Leave the Accept secure connection check box selected if you would like to have an option connecting to each SOSS instance via a secured network connection (aka SSL).
The Installers page lets you specify the location for the SOSS installer and, optionally, for a Java runtime installer (Java is needed if you are planning to support Java-driven PMI applications in Microsoft Azure).
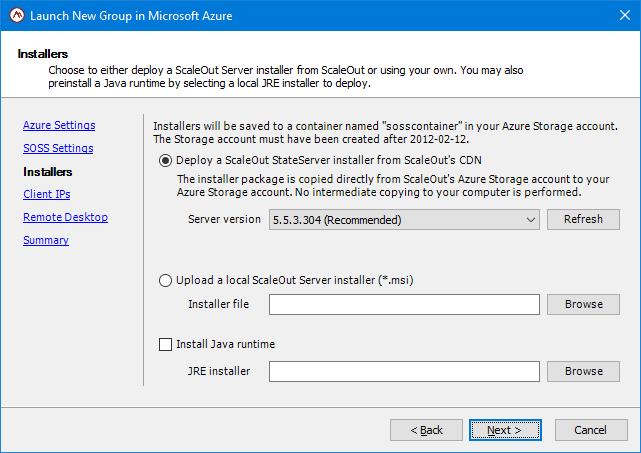
By default, the installer will use the latest recommended release of ScaleOut StateServer. The installer is copied directly from ScaleOut’s Azure storage container into your own Azure storage container (this copying process is performed by Azure Storage so the installer is never downloaded onto your computer). You can also choose to install another version of StateServer from the drop-down list. Note that not all versions are made available for use on Microsoft Azure CloudServices.
You also have the option to upload your own StateServer installer. This is useful if you have a version of StateServer you wish to deploy that is no-longer supported or is a custom build.
Finally, you can optionally choose to install a Java runtime installer. In all cases, the installer is copied to your own Azure storage container prior to the cloud service role instance deployment.
The Client IPs page lets you specify the IP addresses that may access your instances. Microsoft Azure will not allow network access to the instances you are launching unless you specifically provide it with a white list of allowed client IP addresses.
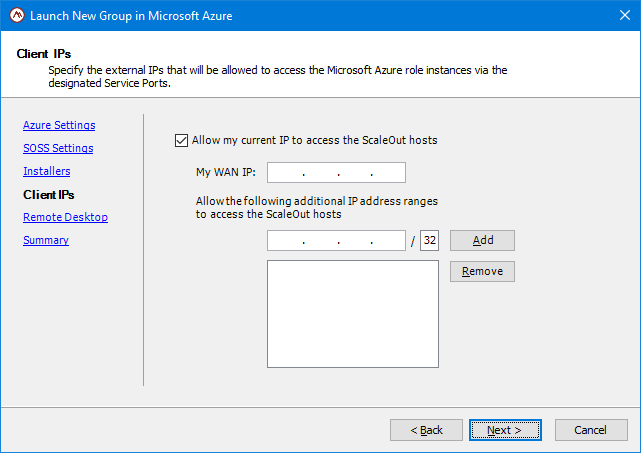
By default, the wizard grants access to the external WAN IP of your local system. (Your external IP is determined by a quick request to an external "What’s My IP?" Web service operated by ScaleOut Software. No personal information is logged when determining your WAN IP.) If you have additional ranges of IP addresses that will need access to the SOSS store, they can be specified on the Client IPs page using CIDR notation.
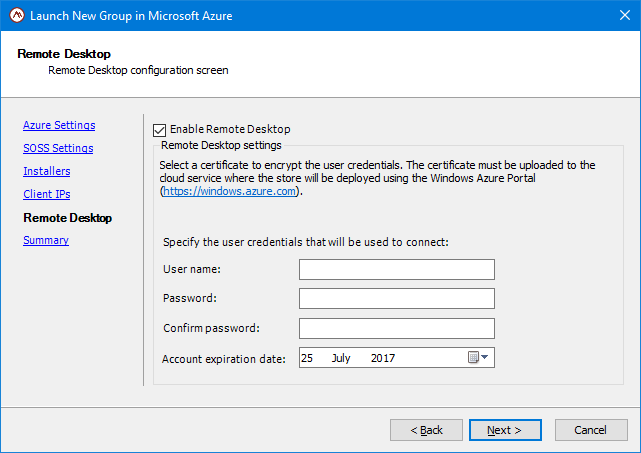
On the Remote Desktop page, Remote Desktop access to your hosted service’s instances can be enabled and configured. Specify user credentials of the new account to be created for instance authorization. If you skip the Remote Desktop configuration step during the wizard, you can configure it later using the ScaleOut Management Console after SOSS has been deployed.
The Wizard Summary page lists the details of all options selected on the previous pages. Enter a Store Name for the new SOSS deployment and the number of instances to launch, and then review the launch details, making any adjustments on previous pages if necessary.
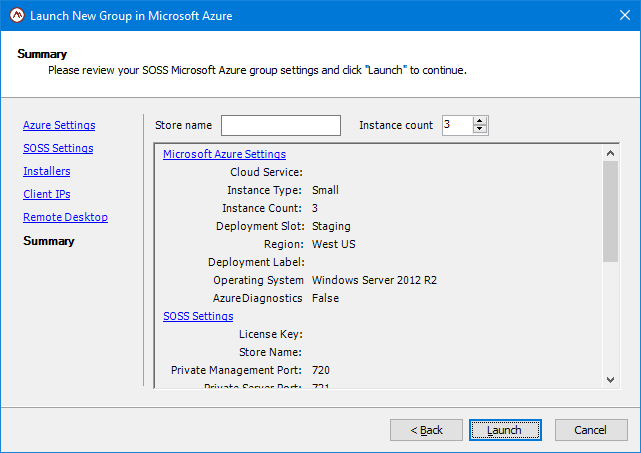
After completing the Launch New Group wizard, you can launch the new SOSS host group from the wizard’s summary page using the Launch button. A status window will appear as instances are started in the Microsoft Azure environment. Once completed, you can close the wizard; the new instances should now be visible in the Console’s Azure Management pane.
![[Note]](../common/images/admon/note.png) |
Note |
|---|---|
|
It may take several minutes to launch an SOSS host group in Microsoft Azure because the instances need to boot their operating systems and configure SOSS to form a host group. |
After all instances have been launched and display a Running status, you can connect to the newly launched SOSS host group so that you can manage it identically to an on-premise host group.
Managing, Scaling, Shrinking, and Stopping SOSS Host Groups Deployed in Microsoft Azure
The Azure Management pane shows you the instances that have been launched for a specified Microsoft Azure connection. For each instance, several attributes are displayed, including the Cloud Service name, SOSS store name, and instance ID. You can refresh the table of instances using the Refresh button to see the latest information.
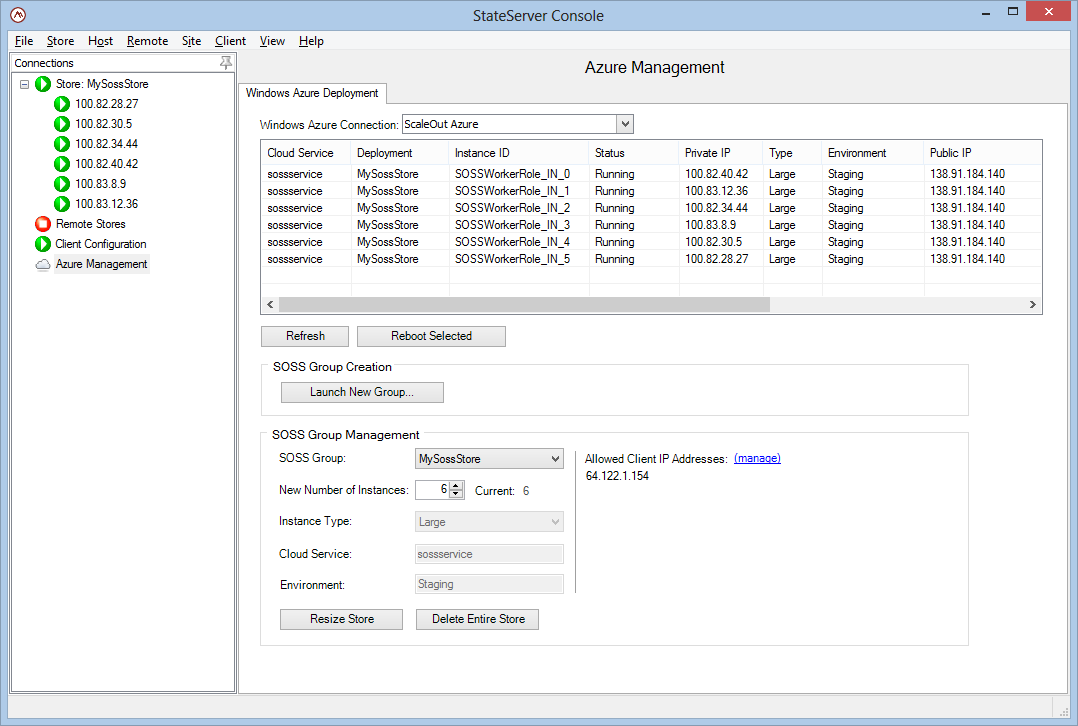
You can reboot selected instances if necessary by selecting the instance and then clicking the Reboot Selected button or by choosing the Reboot item in the context menu for the selected instance.
![[Important]](../common/images/admon/important.png) |
Important |
|---|---|
|
You can also reboot running role instances via Microsoft’s Management Portal. |
To add more instances to an SOSS host group, fill out the fields in the SOSS Group Management box, increasing the total number of instances. Similarly, to shrink a SOSS host group, decrease the total number of instances:
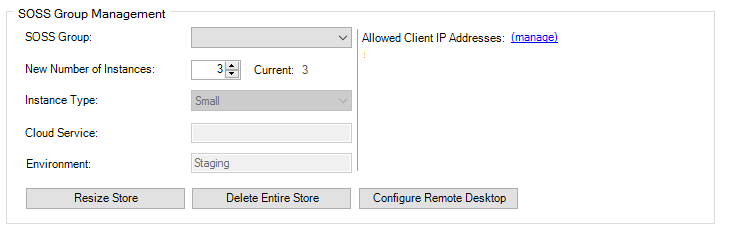
The SOSS Group Management box’s fields are as follows:
- SOSS Group: Select the name of the SOSS store to which you would like to add instances. This field will be disabled if you do not have an existing store.
- New number of instances: Specify the new total number of Microsoft Azure instances for the selected SOSS store.
- Current: The current number of instances which have been launched
- Instance Type: An instance type defines the memory, CPU, storage capacity, and hourly cost for an instance. This field is for informational purposes only and may not be changed.
- Cloud Service: The name of the cloud service into which the SOSS host group has been launched
- Environment: The Azure deployment environment, i.e., production or staging.
You can restrict access to a store deployed in Microsoft Azure by specifying a list of client IP addresses which are allowed access to the SOSS instances running in the cloud. The Client IPs page of the Launch New Group wizard allows you to specify an initial list of IP addresses. This list can be altered after the store has been launched in the Azure Management pane by clicking on the (manage) link located next to the Allowed Client IP Addresses label, which opens the following dialog:
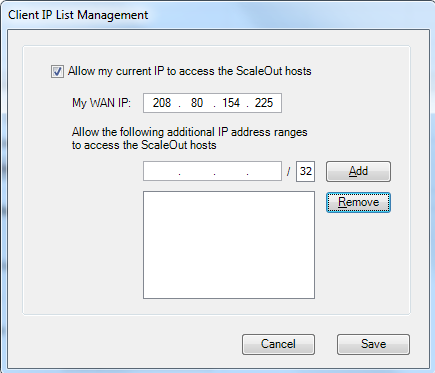
You can change the existing ranges of IP addresses that have access to the SOSS store and add new IPs using CIDR notation. Press the Save button to save all changes and propagate new values to all running SOSS instances. It may take several seconds for the changes to take effect.
Microsoft Azure instances with ScaleOut StateServer installed are configured to automatically perform a leave operation prior to stopping the instance.
|
Note |
|---|---|
|
As a best practice, do not shrink an existing store by more than one instance at a time. Shrinking an existing store one instance at a time minimizes the recovery work that surviving hosts will need to perform. Since Microsoft Azure instances are stopped in parallel, it is possible that shrinking an existing store by more than one instance at a time could result in partial data loss. |
Click the Resize Store button to apply the new number of Microsoft Azure instances to the specified SOSS store’s associated Cloud Service configuration. Microsoft Azure will add or remove instances appropriately. A status window will appear and will report progress as instances are started or stopped in the Microsoft Azure environment.
Click the Delete Entire Store button if you would like to remove all ScaleOut StateServer instances from the deployment. Note that this operation does not delete the associated Cloud Service.
|
Note |
|---|---|
|
It may take several minutes for instances to start or stop in Microsoft Azure. |
Limitations
The current release of ScaleOut StateServer in a Microsoft Azure environment has the following limitations:
- Rolling upgrades are not supported.
The ScaleOut.SOSS.AzureClient NuGet package is a Visual Studio extension that makes it easy to integrate the ScaleOut StateServer (SOSS) remote client libraries with Microsoft Azure Visual Studio projects. When the ScaleOut.SOSS.AzureClient package is installed, it copies the SOSS client libraries to the Visual Studio solution and automatically makes all necessary changes, such as adding references to the SOSS client assemblies and modifying the web.config file if SOSS is used as ASP.NET Session provider.
Before deploying your application that uses ScaleOut remote client libraries, please ensure that you have a deployed a ScaleOut in-memory data grid as a Microsoft Azure Cloud Service. See ScaleOut StateServer’s online help topic for details on deploying the ScaleOut StateServer service to Microsoft Azure. The ScaleOut.SOSS.AzureClient NuGet package can be used in all modern editions of Visual Studio. It requires PowerShell 2.0 and can be installed on the following operating systems:
- Windows Server 2016
- Windows Server 2012 R2
- Windows Server 2012
- Windows Server 2008 R2
- Windows Server 2008
- Windows Server 2003 SP2
- Windows 8
- Windows 7
- Windows Vista SP1
- Windows XP SP3
Using the ScaleOut.SOSS.AzureClient NuGet package
- Download the ScaleOut.SOSS.AzureClient NuGet package from the support downloads page on ScaleOut Software’s web site.
- Put the package into a custom NuGet feed (custom package source repository). If you don’t have one, please follow the steps outlined in the Hosting Your Own NuGet Feeds article, which is available on the NuGet Docs web site.
- Open your Visual Studio solution that contains your Azure project. From the Tools menu, select Library Package Manager and then click Package Manager Console.
- Select your custom NuGet feed by choosing it from the list in the Package source combo-box. Also select the name of the project that you will be publishing to Microsoft Azure from the project list in the Default project combo-box.
- In the console’s command prompt that was opened in step 3, type the following command:
PM> Install-Package "ScaleOut.SOSS.AzureClient" -Version 1.x.x.xxx
The ScaleOut.SOSS.AzureClient NuGet package makes the following changes when it is added to your project:
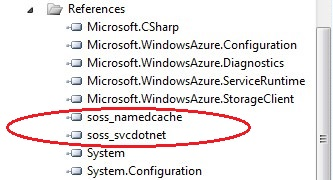
-
In Solution Explorer, two SOSS assembly references are added:
- soss_namedcache
- soss_svcdotnet
-
If your project is an ASP.NET web site or web application that is being deployed as a Microsoft Azure Web Role, the following <sessionState> section is also added to the web.config file and configured to use ScaleOut’s ASP.NET Session provider:
<sessionState mode="Custom" customProvider="SossStoreProvider" cookieless="UseCookies" >
  <providers>
    <add name="SossStoreProvider" type="Soss.Web.SossStoreProvider, soss_storeprovider, Version=5.0.0.0, Culture=neutral, PublicKeyToken=a1ec0b86f746a476" />
  </providers>
</sessionState>
-
A new Startup folder is added to the project, which contains 3 files:
- InstallSOSS.cmd: A script that will be used as a Microsoft Azure instance startup script.
- soss_client_params.txt: A SOSS remote client configuration file that contains a default set of connection parameters that the application will use to connect to a running ScaleOut data grid. See the
- soss_setup64_liteclient.msi: An installer that is used to install SOSS client components on each Microsoft Azure role instance.
-
The ScaleOut specific startup task referencing the above-mentioned InstallSOSS.cmd file is added to the ServiceDefinition.csdef file:
<Startup>
  <Task commandLine="Startup\InstallSOSS.cmd" executionContext="elevated" taskType="simple" />
</Startup>
- If you choose to uninstall the package from your project’s settings, all added files are removed, and ScaleOut entries are removed from all project configuration files.
PM> Uninstall-Package "ScaleOut.SOSS.AzureClient" -Version 1.x.x.xxx
Configuring SOSS remote client libraries in Microsoft Azure
- Configure the remote client’s settings to access a SOSS store in Microsoft Azure by running the SOSS Management Console or the soss.exe command line tool on a local workstation. Please follow the steps outlined in the Connecting to a Cloud-Hosted Store section.
-
Open the soss_client_params.txt file located in the ScaleOut installation directory on the local workstation and copy the two lines containing the
store_accessandselected_storeparameters. - Open the soss_client_params.txt file located in the Startup folder added by the ScaleOut.SOSS.AzureClient NuGet package in the Visual Studio application project and append the previously copied lines.
- Build and deploy your Microsoft Azure application. After your application is deployed, the ScaleOut client components will be installed on each cloud role instance of your application and auto-configured to access the specified SOSS store.
- Configure firewall settings for the cloud service where the SOSS store is running. Open the SOSS Management Console and select the Azure Management node on the tree. Connect to the target SOSS store and add the public IP (VIP address) of the cloud service where your application is deployed to the list of allowed client IP addresses by clicking on the (manage) link.
